Oracle iLOM remote server console redirection in Ubuntu Desktop 20.04
Installing IcedTea / Java Webstart

Platforms used in this demo
Client-side
The procedures were tested on Ubuntu 20.05 desktop, Brave Browser Version 1.35.103 (64-bit) and Firefox Browser version 97 (64-bit) for Ubuntu Canonical-1.0.
Server-side
On the remote server-side, tests were performed using Oracle Integrated Lights Out Management v. 4.0.4.22 firmware.
Required desktop software
Java Web Start
To enable the iLOM Console redirection functionality, you need the Java Web Start (JWS) software. The Java Web Start software allows you to download and run Java applications from the web, through services specified by the Java Network Launching Protocol (JNLP) API.
JWS is included in the Java Runtime Environment (JRE) since the release of Java 5.0, and up to release 8. It was deprecated in Java 9. You can read more about Oracle's Java Web Start software, here.
You can still get Oracle's JRE8 here.
You are free to download and use Oracle's JWS software. However, in this demonstration, I am showing you how to get things done in Ubunto 20.04, and so I will be using the JWS software that is provided by IcedTea, which is made available through the standard Ubuntu software repositories.
IcedTea's NetX - An alternative to Oracle's Java Web Start
Originally, NetX created icedtea-netx, a drop-in replacement for JWS. Currently, IcedTea is hosting and modifying the NetX sources in their IcedTea-Web directory. This package provides the services specified by the JNLP API. You can read more about the icedtea-netx package here.
Ubuntu provides the icedtea-netx package through its standard software repositories. So installing it is easy and straightforward, using the dpkg package manager.
Installing the icedtea-netx package
The icedtea-netx package is not installed by default. So check if the package is installed, using the command dpkg -l | grep icedtea-netx.
If not already installed, install the icedtea-netx package using Ubuntu's package manager, sudo apt-get install icedtea-netx. (Notice that installing the icedtea-netx package, will automatically install the accompanying Java Runtime Environment (JRE)).
user1@demo:~/Desktop$ sudo apt-get install icedtea-netx
Reading package lists... Done
Building dependency tree
Reading state information... Done
The following additional packages will be installed:
  ca-certificates-java default-jre default-jre-headless openjdk-11-jre openjdk-11-jre-headless
Suggested packages:
  fonts-ipafont-gothic fonts-ipafont-mincho fonts-wqy-microhei | fonts-wqy-zenhei
The following NEW packages will be installed:
  ca-certificates-java default-jre default-jre-headless icedtea-netx openjdk-11-jre openjdk-11-jre-headless
0 upgraded, 6 newly installed, 0 to remove and 12 not upgraded.
Need to get 37.5 MB/39.2 MB of archives.
After this operation, 175 MB of additional disk space will be used.
Do you want to continue? [Y/n] y
After installing the package, you can confirm the installation using the command dpkg -l | grep icedtea-netx.
user1@demo~/Desktop$ dpkg -l | grep icedtea-netx
ii  icedtea-netx    1.8-0ubuntu8     amd64    NetX - implementation of the Java Network Launching Protocol (JNLP)
As mentioned before, the Java JRE is automatically installed during the IcedTea-NetX package installation. You can confirm this by executing dpkg -l | grep 'jre\|openjdk\'.
or alternativelydpkg -l | grep -e jre -e openjdk`.
user1@demo:~/Desktop$ dpkg -l | grep 'jre\|openjdk'
ii  default-jre                                2:1.11-72                             amd64        Standard Java or Java compatible Runtime
ii  default-jre-headless                       2:1.11-72                             amd64        Standard Java or Java compatible Runtime (headless)
ii  openjdk-11-jre:amd64                       11.0.13+8-0ubuntu1~20.04              amd64        OpenJDK Java runtime, using Hotspot JIT
ii  openjdk-11-jre-headless:amd64              11.0.13+8-0ubuntu1~20.04              amd64        OpenJDK Java runtime, using Hotspot JIT (headless)
Redirecting the remote server's console
At this point, your desktop should be ready to implement the remote console redirection functionality.
Example of an Oracle Virtual Machine Server for x86 remote console
In the following example, I will demonstrate how to redirect the console of a remote Oracle Sun X4-2 server to your local client machine. The remote server is an Oracle Virtual Machine Server for x86 compute node. The ability to view this particular server console is very helpful when troubleshooting virtual machines during times when your OVM Manager server is not available, or when it is behaving abnormally.
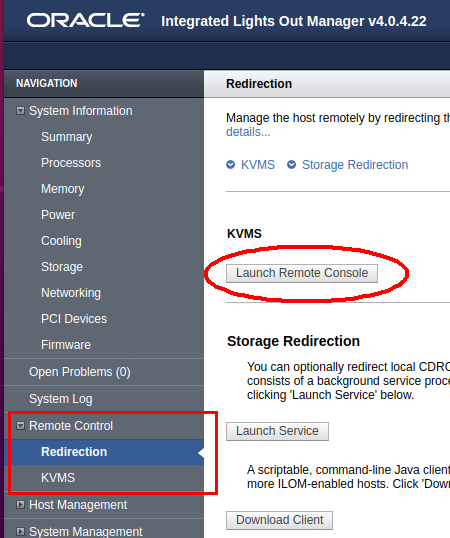
Login to the iLOM web interface
Login to the iLOM web interface. Do this by opening a browser and navigating to your remote server's service processor (SP) IP address, for example, https://your_remote_ip.
After logging in to the iLOM web interface, navigate to the Remote Control-> Redirection menu item (located on the lefthand side of the web page). Click on the Launch Remote Console button.
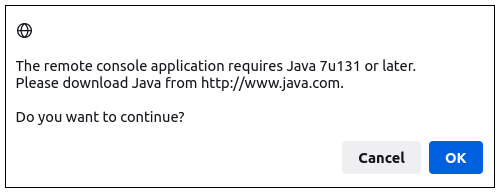
Notice: Java software is required
The next message informs you that Java software is required to complete the following steps. Since you have installed the Java components already, click on OK.
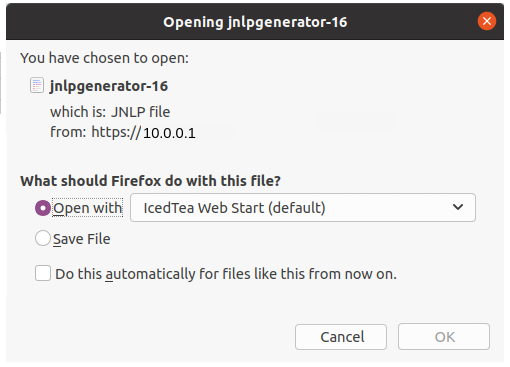
Open the JNLP file
The next step is where the Java Web Start software that was installed earlier, comes into play. The browser will automatically download a JNLP file, and then prompt you to choose an application with which to open the JNLP file. Select Icedtea Web Start from the dropdown list.
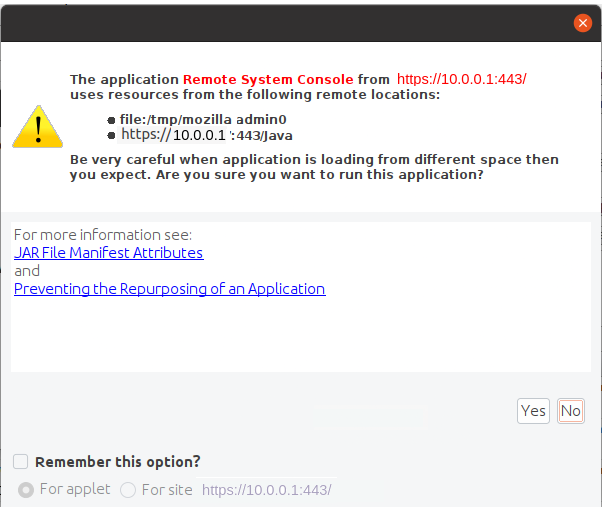
The next two messages are security related.
Click Run

Click Yes
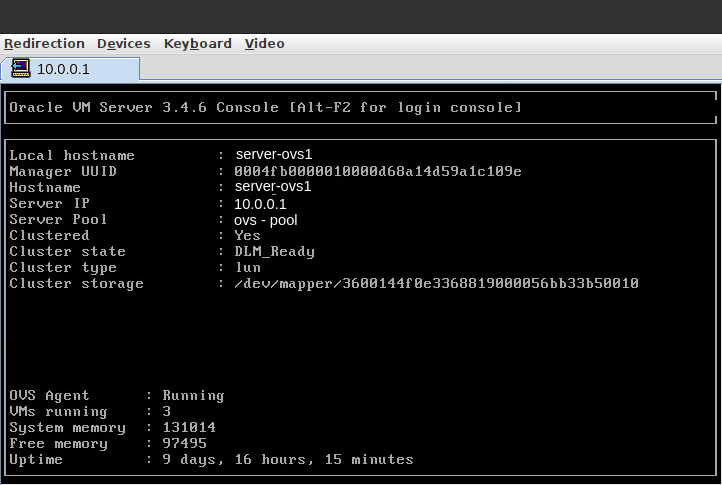
Finally. A view of the remote server's console
Finally, you are presented with a view of the remote server's console.
Done and dusted
That's it from me.
References:


