Mini cloud for prototyping
I recently discovered Multipass, an application developed by Canonical. This application makes it easy to launch and manage multiple Ubuntu virtual machines locally. It also allows quick access through a command line interface (CLI) to the virtual machines' command line(s). You can essentially create your own local mini-cloud for prototyping your applications and scripts.
Multipass on Linux
Multipass for Linux is published as a snap package, available on the Snap Store.
Before you can use Multipass, you need to install snapd if it is not already installed.
snapd on Ubuntu
snapd is included in Ubuntu 16.04 LTS (Xenial Xerus) or later by default. For this review, I am using Ubuntu 20.04. So I am good to go out of the box. For older Ubuntu versions, check here, snapcraft.io/docs/installing-snap-on-ubuntu, for instructions on how to install snapd.
snapd on other flavors of Linux
If you are not running Ubuntu and need to install snapd, check out the instructions here, Installing snapd, for installing it on your flavor of Linux.
Installing Multipass on Linux
Installing Multipass
To install Multipass, simply execute snap install multipass.
sysadmin@demo:~$ snap install multipass
To check the installed Multipass version, execute 'multipass version`.
sysadmin@demo:~$ multipass version
multipass   1.9.2
multipassd  1.9.2
Upgrading Mutipass
Since the installation is done via a snap, you don’t need to worry about upgrading. Upgrading will be done automatically.
Uninstalling Multipass
To uninstall Multipass, simply run:
sysadmin@demo:~$ snap remove multipass
Listing available virtual machines
Ubuntu provides a curated catalog of virtual machine images with built-in apps. To get a list of these available virtual machine images, execute multipass find. At the time of writing, there were x24 virtual machines to select from.
sysadmin@demo:~$ multipass find
Image                       Aliases           Version          Description
snapcraft:core18            18.04             20201111         Snapcraft builder for Core 18
snapcraft:core20            20.04             20210921         Snapcraft builder for Core 20
snapcraft:core22            22.04             20220426         Snapcraft builder for Core 22
snapcraft:devel                               20220620         Snapcraft builder for the devel series
core                        core16            20200818         Ubuntu Core 16
core18                                        20211124         Ubuntu Core 18
18.04                       bionic            20220615         Ubuntu 18.04 LTS
20.04                       focal,lts         20220615         Ubuntu 20.04 LTS
21.10                       impish            20220609         Ubuntu 21.10
22.04                       jammy             20220609         Ubuntu 22.04 LTS
daily:22.10                 devel,kinetic     20220615         Ubuntu 22.10
appliance:adguard-home                        20200812         Ubuntu AdGuard Home Appliance
appliance:mosquitto                           20200812         Ubuntu Mosquitto Appliance
appliance:nextcloud                           20200812         Ubuntu Nextcloud Appliance
appliance:openhab                             20200812         Ubuntu openHAB Home Appliance
appliance:plexmediaserver                     20200812         Ubuntu Plex Media Server Appliance
anbox-cloud-appliance                         latest           Anbox Cloud Appliance
charm-dev                                     latest           A development and testing environment for charmers
docker                                        latest           A Docker environment with Portainer and related tools
minikube                                      latest           minikube is local Kubernetes
Installing a virtual machine
OpenHAB appliance: In the example below, I installed the home automation appliance called OpenHAB. You can read more about this appliance here OpenHAB. For more information on the OpenHAB application, check out the official homepage here, OpenHAB.
To install one of the available virtual machine images, simply execute multipass install *the-image-name*. In the example below I am installing the OpenHAB appliance.
sysadmin@demo:~$ multipass launch appliance:openhab
Retrieving image: 2%
Once the installation completes, the virtual machine will be launched automatically.
Since I did not specify a name for the virtual machine, Multipass assigned a random name, i.e., lovable-grayling in this case.
rudi-admin@ubu:~$ multipass launch appliance:openhab
Launched: lovable-grayling
Confirm that the new virtual machine was installed by checking its status. Do this by executing multipass list.
rudi-admin@ubu:~$ multipass list
Name                    State             IPv4             Image
lovable-grayling        Running           10.5.129.210     Ubuntu openHAB Home Appliance
Checking the virtual machine specs
You can get a nice overview of the virtual machine's specs by executing multipass info lovable-grayling
sysadmin@demo:~$ multipass info lovable-grayling
Name:           lovable-grayling
State:          Running
IPv4:           10.5.129.210
Release:        openHAB Home Appliance
Image hash:     3e6716944f7a (Ubuntu openHAB Home Appliance)
Load:           0.21 0.26 0.19
Disk usage:     55.6M out of 55.6M
Memory usage:   419.2M out of 985.1M
Mounts:         --
Naming the VM
To launch an instance with a specific name, simply add the --name option to the command line:
multipass launch appliance:openhab --name MyOpenHab
Launched: MyOpenHab
GUI Menu in the system tray
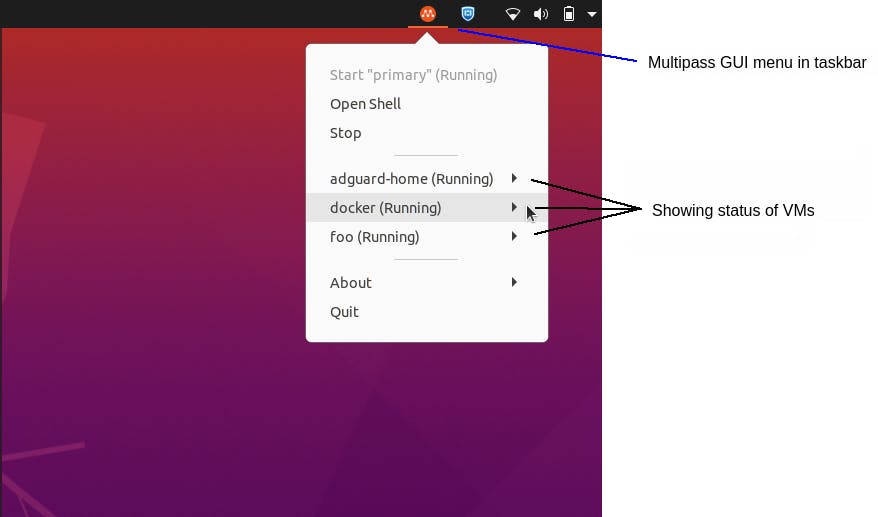
Multipass is loaded during boot time, and a GUI menu is visible in the system tray.
VM status is shown in GUI menu
The menu will list the status of all your installed virtual machines.

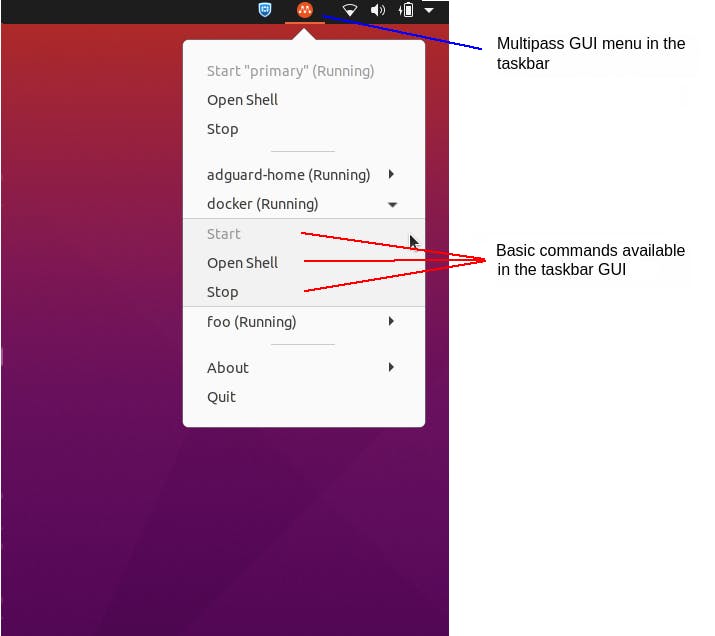
Basic commands in the GUI menu
There are a few basic commands available in the GUI Menu, which are listed per virtual machine. That is Start, Stop, and Open Shell.

Initial impressions
I love the simplicity of it all. You can deploy lots of virtual machines essentially as fast as your internet connection speed will allow. I deployed x5 VMs without any hassles whatsoever. These included a Docker appliance, an ADGuard appliance, and an OpenHab appliance.
sysadmin@demo:~$ multipass list
Name                    State             IPv4             Image
primary                 Running           10.5.129.80      Ubuntu 20.04 LTS
adguard-home            Running           10.5.129.39      Ubuntu AdGuard Home Appliance
docker                  Running           10.5.129.147     Ubuntu 21.10
                                          172.17.0.1
foo                     Running           10.5.129.196     Ubuntu 20.04 LTS
lovable-grayling        Running           10.5.129.210     Ubuntu openHAB Home Appliance
All these virtual machines went up without a hitch, requiring no additional configurations or special skills to get them to work. All the virtual machines are automatically networked with IP addresses assigned. I could immediately start to play around, ping stuff, and test my Python scripts.
Pleasantly surprised
I properly tested out two of the available appliances, namely docker and adguard-home. And I was surprised by how easy it was to get fully functional instances of these two virtual machines up and running.
Docker with a GUI, out of the box
With the Docker instance, you get a full Docker Engine, and a Portainer container instance configured, ready to go, out of the box. You can immediately start to deploy custom containers using templates or via the Docker Registry.
AddGuard, out of the box
With the AdGuard-Home instance, I was able to deploy a powerful (and free) ad-blocking service within minutes. I just needed to add the instance's IP address to my home router as an additional DNS server. And boom... it started to block ads!
I love it.
References:
How to install Multipass on Linux
Setup the AdGuard Ubuntu Appliance in a virtual machine
Container Management Made Easy